Checkboxes transform static spreadsheets into interactive tools that streamline task management, inventory tracking, and data collection. Whether you're building a project tracker, creating a to-do list, or designing a survey form, understanding how do you make checkboxes in Excel unlocks powerful functionality for business workflows. Excel offers two distinct methods for adding checkboxes: the modern checkbox feature available in Microsoft 365 and the traditional Developer tab approach that works across all versions. Each method serves different purposes and comes with unique advantages for data analysis and automation.
Understanding Excel Checkbox Methods
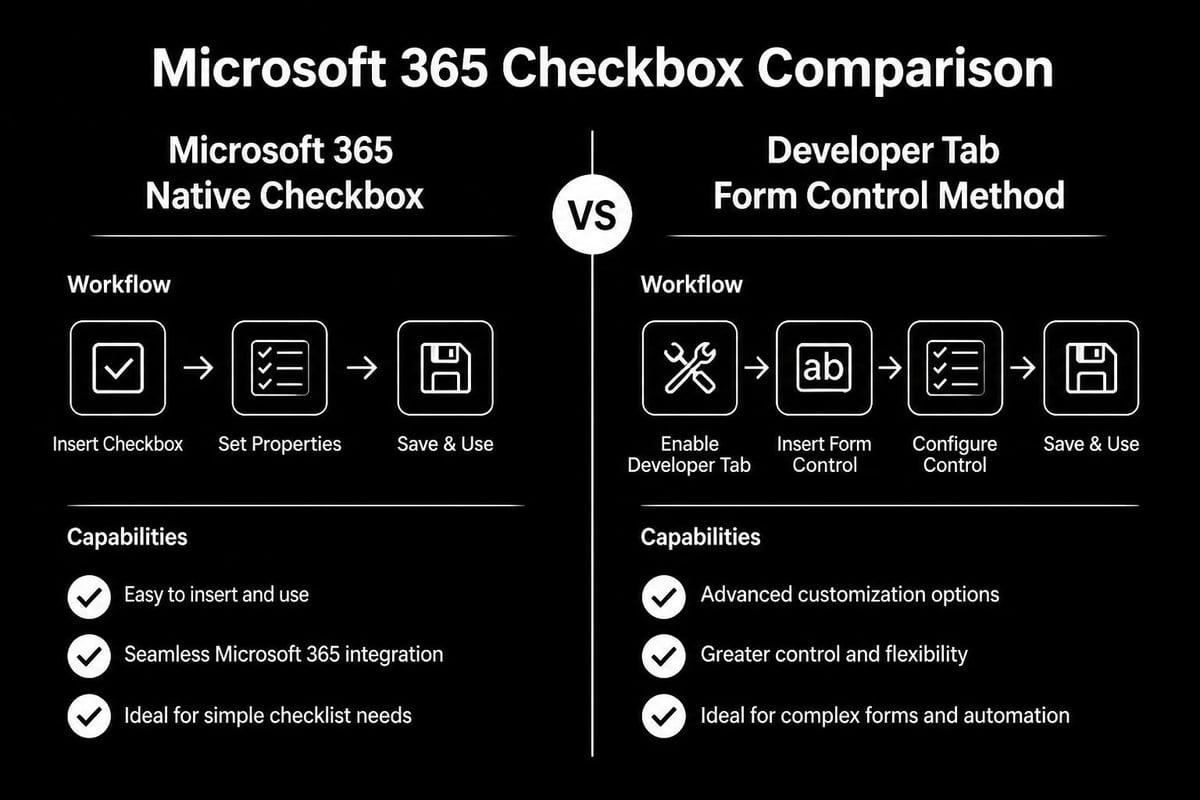
Excel provides multiple pathways for adding interactive checkboxes to your spreadsheets, each tailored to specific user needs and Excel versions. The choice between these methods depends on your subscription level, technical requirements, and intended use case.
Microsoft 365 Checkbox Feature
Microsoft 365 subscribers gained access to a streamlined checkbox insertion feature in recent updates. This native functionality allows users to insert checkboxes directly into cells without accessing developer tools or form controls. The checkboxes automatically populate cells with TRUE or FALSE values, making them ideal for formulas and calculations.
Key advantages include:
- Direct cell integration without overlaying objects
- Automatic TRUE/FALSE value assignment
- Simple insertion through the Insert tab
- Seamless formula compatibility
- Clean, professional appearance
According to Microsoft’s official documentation on using checkboxes, this feature represents a significant improvement over traditional form controls for basic checkbox functionality.
Developer Tab Form Controls
The Developer tab method remains the standard approach for Excel versions without Microsoft 365 or when advanced customization is required. This technique uses ActiveX controls or form controls that overlay spreadsheet cells, offering greater flexibility for complex interactions and visual design.
Form control checkboxes provide:
- Compatibility across all Excel versions
- Advanced customization options
- VBA integration capabilities
- Multiple checkbox types (ActiveX vs. form controls)
- Cell linking for data capture
Enabling the Developer Tab
Before you can access form controls, the Developer tab must be visible in your Excel ribbon. This one-time setup unlocks numerous advanced features beyond checkboxes, including macros, add-ins, and controls.
Step-by-Step Activation Process
- Open Excel Options: Click File, then select Options from the left sidebar
- Navigate to Customize Ribbon: Select the Customize Ribbon category from the options menu
- Enable Developer Tab: Check the box next to Developer in the right panel under Main Tabs
- Confirm Changes: Click OK to save your settings and close the dialog
The Developer tab now appears in your ribbon between the View and Help tabs. This setting persists across all workbooks and future Excel sessions until manually disabled.
| Setting Location | Navigation Path | Result |
|---|---|---|
| Excel Options | File > Options | Opens configuration menu |
| Customize Ribbon | Options > Customize Ribbon | Shows available tabs |
| Developer Checkbox | Main Tabs > Developer | Activates advanced features |
If you work extensively with Excel's powerful features, consider exploring how to create dashboards in Excel to leverage checkboxes in visual data presentations.
Inserting Checkboxes Using Microsoft 365
Microsoft 365's native checkbox feature simplifies the insertion process dramatically compared to traditional methods. This approach works best for straightforward task lists, survey responses, and basic data collection scenarios.
Quick Insertion Steps
Select the cell or range where you want checkboxes to appear. Navigate to the Insert tab on the ribbon and locate the Checkbox option in the Controls group. Click Checkbox to instantly populate selected cells with interactive checkboxes.
Each checkbox inserted this way automatically assigns TRUE when checked and FALSE when unchecked. These boolean values integrate seamlessly with Excel formulas, conditional formatting, and data analysis functions.
Common applications include:
- Project task completion tracking
- Quality control checklists
- Attendance or participation records
- Survey and feedback forms
- Inventory verification lists
For guidance on working with boolean logic in Excel, the EXACT Excel function article provides insights into text comparison that complements checkbox functionality.
Working with Checkbox Values
The TRUE/FALSE values generated by Microsoft 365 checkboxes enable powerful formula integration. Use COUNTIF to tally completed tasks, IF statements to trigger conditional actions, or SUMIF to calculate totals based on checkbox states.
Example formula applications:
=COUNTIF(A2:A10,TRUE)  // Counts checked boxes
=IF(B2=TRUE,"Complete","Pending")  // Status based on checkbox
=SUMIF(C2:C10,TRUE,D2:D10)  // Sum values where box is checked
Creating Checkboxes Through Developer Tab
When you need how do you make checkboxes in Excel with advanced customization or compatibility across different Excel versions, the Developer tab method provides comprehensive control over checkbox behavior and appearance.
Inserting Form Control Checkboxes
After enabling the Developer tab, click it to reveal advanced controls. Select Insert from the Controls group, then choose the Checkbox option under Form Controls (not ActiveX Controls for basic implementations).
Your cursor transforms into a crosshair. Click and drag on your spreadsheet to draw a checkbox of your desired size. The checkbox appears with default text like "Check Box 1" that you can immediately edit by right-clicking.

Linking Checkboxes to Cells
Form control checkboxes don't automatically populate cell values like Microsoft 365 checkboxes. You must manually link each checkbox to a cell to capture its checked state.
Linking procedure:
- Right-click the checkbox and select Format Control
- Navigate to the Control tab in the dialog box
- Click the Cell Link field and select your target cell
- Click OK to establish the connection
The linked cell now displays TRUE when checked and FALSE when unchecked, identical to Microsoft 365 checkbox behavior. This linking enables formula integration and data analysis based on checkbox states.
According to How-To Geek’s comprehensive checkbox guide, cell linking represents the most critical step for functional checkbox implementation with form controls.
Customizing Checkbox Appearance
Professional spreadsheets require checkboxes that align with branding standards and design requirements. Both checkbox methods offer customization options, though the extent varies significantly.
Editing Checkbox Text
For form control checkboxes, right-click the checkbox and select Edit Text to modify the label. Delete the default text entirely or replace it with descriptive labels like "Task Complete," "Approved," or "Verified."
Position the checkbox independently from its text by clicking the checkbox border (not the box itself) and dragging. This separation allows precise alignment with spreadsheet rows and columns.
Formatting and Styling Options
Right-click form control checkboxes and select Format Control to access extensive customization settings. Adjust checkbox size by dragging corner handles while holding Shift to maintain proportions.
| Customization Option | Access Method | Effect |
|---|---|---|
| Text Label | Right-click > Edit Text | Changes checkbox description |
| Size | Drag corner handles | Adjusts checkbox dimensions |
| Position | Click border and drag | Moves checkbox location |
| Cell Link | Format Control > Control tab | Connects to data cell |
| Colors | Format Control > Colors tab | Modifies appearance (limited) |
For users seeking help with Excel customization beyond checkboxes, expert Excel help provides personalized guidance for spreadsheet challenges.
Building Interactive Task Lists
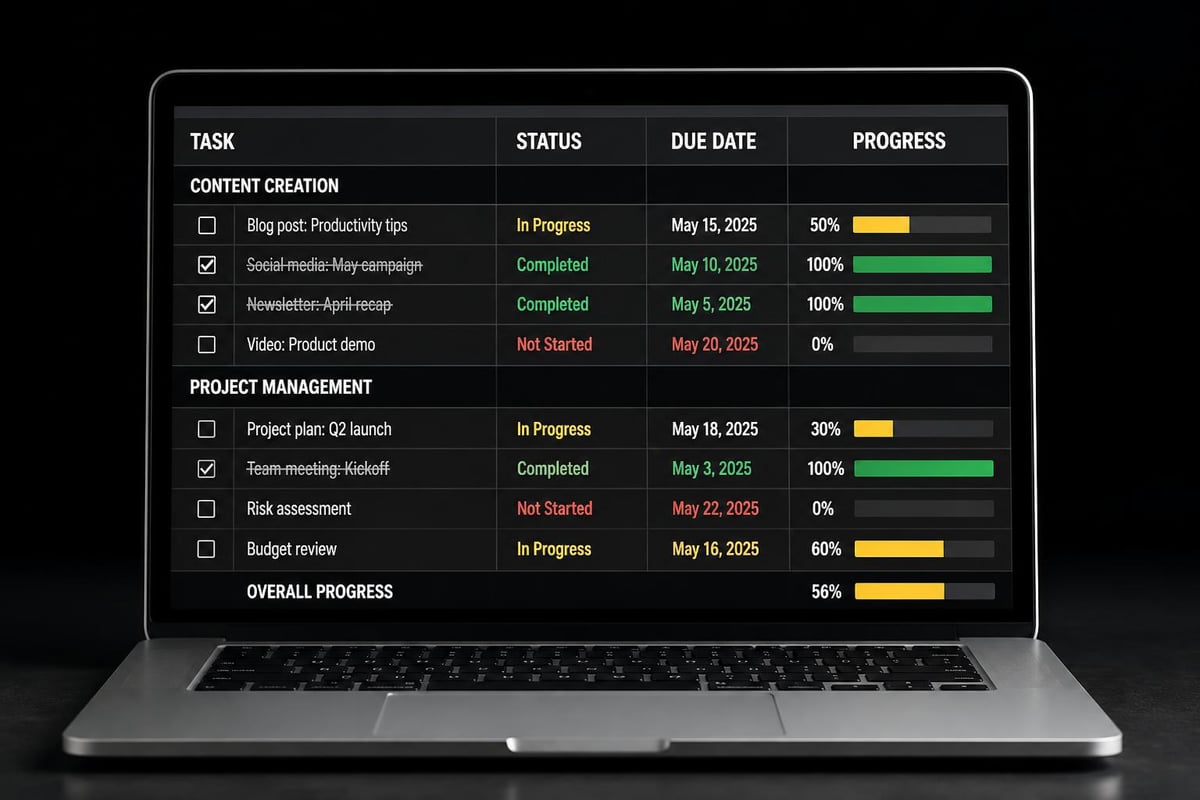
Understanding how do you make checkboxes in Excel transforms basic spreadsheets into dynamic task management tools. Combining checkboxes with conditional formatting and formulas creates professional project trackers.
Task List Structure
Create column headers for Task Name, Checkbox, Status, and Due Date. Insert checkboxes in the Checkbox column using either method discussed earlier. Link each checkbox to a hidden column or use Microsoft 365's native checkboxes for automatic TRUE/FALSE values.
In the Status column, use an IF formula to display completion status:
Formula structure:
=IF(B2=TRUE,"✓ Complete","○ Pending")
This formula checks the checkbox state and displays appropriate text with visual symbols for quick scanning.
Adding Conditional Formatting
Conditional formatting automatically highlights completed tasks, providing immediate visual feedback. Select your task list range and create a formatting rule based on the checkbox column.
Steps for conditional formatting:
- Select the task list data range
- Click Conditional Formatting > New Rule
- Choose "Use a formula to determine which cells to format"
- Enter formula:
=$B2=TRUE(adjust column reference) - Set formatting (strikethrough, gray fill, or custom style)
- Click OK to apply
Completed tasks now automatically display distinctive formatting, separating finished items from pending work.
Advanced Checkbox Applications
Checkboxes extend far beyond simple task lists when combined with Excel's analytical capabilities. These advanced implementations showcase the versatility of checkbox functionality in business contexts.
Dynamic Data Filtering
Create interactive reports where users check boxes to filter visible data. Combine checkboxes with the FILTER function (Microsoft 365) or advanced filter criteria to display relevant records based on selections.
Example scenario:
A sales dashboard with checkboxes for each region (North, South, East, West) that dynamically displays sales data only for checked regions.
Implementation approach:
- Place checkboxes for each filter option
- Link checkboxes to cells capturing TRUE/FALSE states
- Use FILTER or IF formulas to show data where corresponding checkbox equals TRUE
- Combine multiple checkbox states with AND/OR logic for complex filtering
Progress Tracking and Calculations
Calculate project completion percentages automatically based on checkbox states. Use COUNTIF to count checked boxes and divide by total tasks for instant progress metrics.
Progress formula example:
=COUNTIF(B2:B20,TRUE)/COUNTA(B2:B20)
This formula divides checked boxes by total checkboxes, producing a percentage you can format as a progress indicator. Combine with conditional formatting or data bars for visual progress representation.
For more complex calculations involving multiple criteria, explore resources on calling functions in VBA to automate checkbox-driven processes.
Survey and Feedback Forms
Design professional feedback collection tools using checkboxes for multiple-choice responses. Each question gets checkboxes for possible answers, with cell linking capturing responses for analysis.
Survey design best practices:
- Use consistent checkbox placement for visual alignment
- Group related questions in sections
- Link checkboxes to a data table for analysis
- Apply data validation to prevent conflicting selections
- Calculate response summaries using COUNTIF or SUMIF
The Simplilearn Excel checkbox tutorial provides additional examples of survey implementation with detailed troubleshooting guidance.
Troubleshooting Common Checkbox Issues
Even experienced users encounter challenges when implementing checkboxes. These solutions address the most frequent problems reported by Excel users.
Checkboxes Not Responding
If checkboxes don't toggle when clicked, verify that Design Mode is disabled in the Developer tab. Design Mode allows checkbox editing but prevents functional interaction. Click the Design Mode button to toggle it off.
Additionally, check worksheet protection settings. Protected worksheets may restrict checkbox interaction unless specifically allowed in protection settings.
Cell Link Errors
When linked cells display error values or unexpected results, review the cell link reference in Format Control. Ensure the reference points to a valid, unlocked cell without existing formulas.
Common cell link mistakes:
- Linking to a merged cell (causes inconsistent behavior)
- Referencing cells with existing formulas (overwrites formulas)
- Using circular references that include the checkbox's linked cell
- Linking multiple checkboxes to the same cell (only captures last interaction)
Checkbox Alignment Problems
Form control checkboxes sometimes misalign with rows when sorting or filtering data. They overlay cells rather than embedding within them, causing positional issues during data manipulation.
Solutions include:
- Convert to Microsoft 365 native checkboxes for automatic alignment
- Group checkboxes with related rows using object grouping
- Lock checkbox positions after finalizing spreadsheet layout
- Use VBA to programmatically reposition checkboxes after data changes
The Finofo checkbox insertion guide offers additional troubleshooting approaches for persistent alignment challenges.
Checkbox Best Practices for Professional Spreadsheets
Implementing checkboxes effectively requires attention to design principles and user experience considerations. These best practices ensure checkboxes enhance rather than complicate your spreadsheets.
Consistent Sizing and Spacing
Maintain uniform checkbox dimensions throughout your workbook for professional appearance. Set a standard size (typically 12-15 points) and apply it consistently across all checkboxes.
Use Excel's alignment tools to space checkboxes evenly. Select multiple checkboxes, right-click, choose Format Object, and use the Align or Distribute options to create precise spacing.
Strategic Placement
Position checkboxes in dedicated columns rather than overlaying data cells. This separation prevents accidental clicks on checkboxes when selecting cells and maintains clean data structure for sorting and filtering.
Consider left-aligning checkboxes for task lists and right-aligning for approval workflows, matching cultural reading patterns and user expectations.
Documentation and Instructions
Include brief instructions for checkbox interaction, especially in shared workbooks. Add comments or text boxes explaining how checked states affect calculations or trigger actions.
For complex implementations, create a separate instruction sheet detailing checkbox purposes and expected user behavior.
| Best Practice | Reason | Implementation |
|---|---|---|
| Uniform sizing | Professional appearance | Use Format Control to set standard dimensions |
| Dedicated columns | Prevents accidental clicks | Create checkbox-only column |
| Clear labels | Improves usability | Use descriptive text adjacent to checkboxes |
| Consistent linking | Reliable data capture | Establish linking pattern for all checkboxes |
| Testing | Ensures functionality | Verify all checkboxes before sharing |
When building comprehensive Excel solutions, consider how checkboxes integrate with other elements. Professional Excel templates often combine checkboxes with charts, pivot tables, and automated reporting for complete business intelligence tools.
Checkbox Formulas and Functions
Maximizing checkbox utility requires understanding how do you make checkboxes in Excel work within formula contexts. These formula patterns unlock checkbox potential for calculations and automation.
Counting Checked Boxes
The COUNTIF function tallies checked boxes efficiently:
=COUNTIF(range,TRUE) counts all TRUE values in the specified range.
For percentage calculations, divide checked count by total:
=COUNTIF(B2:B50,TRUE)/COUNTA(B2:B50)*100
Conditional Calculations
SUMIF and AVERAGEIF perform calculations based on checkbox states:
=SUMIF(checkbox_range,TRUE,value_range)sums values where boxes are checked=AVERAGEIF(checkbox_range,TRUE,value_range)averages checked items
These functions enable budget tracking where checkboxes mark approved expenses or inventory counts where checkboxes indicate items in stock.
Logical Operations
Combine multiple checkbox states using AND, OR, and NOT functions:
Complex logic examples:
=AND(A2=TRUE,B2=TRUE)returns TRUE only when both checkboxes are checked=OR(A2=TRUE,B2=TRUE)returns TRUE when either checkbox is checked=NOT(A2=TRUE)inverts the checkbox state for reverse logic
These logical operations support approval workflows requiring multiple sign-offs or safety checklists where all items must be verified before proceeding.
Mastering checkbox implementation in Excel transforms static spreadsheets into interactive business tools that streamline workflows and improve data accuracy. Whether you choose the modern Microsoft 365 approach or the versatile Developer tab method, checkboxes enable powerful task tracking, data collection, and conditional logic that adapts to your specific needs. If you're struggling with checkbox functionality, formula integration, or any other spreadsheet challenge, The Analytics Doctor offers expert guidance to diagnose problems and implement clean, efficient solutions that make your Excel workbooks work smarter.