Ever opened a spreadsheet that feels like a brick, taking forever to load, and wondered why it’s so bulky?
You’re not alone. Most of us have spent precious minutes watching the hourglass spin, scrolling through endless rows, only to realize the file size is the silent culprit.
In this guide we’ll walk through practical ways to reduce excel file size without sacrificing the data you need.
First, think about the hidden weight in your workbook – excess formatting, unused cells, and duplicated formulas. Those tiny things add up, turning a neat 2 MB file into a monstrous 50 MB monster.
So, what can you actually do? Let’s start with the low‑hanging fruit: clean up stray formatting. Select the whole sheet, hit Ctrl + Shift + End to see the true used range, and delete any rows or columns that sit beyond your data.
Next, consider converting volatile functions like OFFSET or INDIRECT into static values once the calculation is settled. This alone can shave off several megabytes.
If you’re juggling dozens of images or embedded objects, compress them or store them externally. A single high‑resolution picture can bloat a file more than a thousand rows of numbers.
Another often‑overlooked trick is to save the workbook as an .xlsx instead of the older .xls format; the newer XML‑based structure is inherently more compact.
When you need advanced analytics, consider moving heavy data tables to Power Query or Power Pivot, letting the engine handle storage more efficiently.
And if you ever feel stuck, a quick call to Microsoft Excel consulting services can give you a tailored cleanup plan that targets the exact bloat in your files.
Does any of this sound familiar? Good, because we’ll dive deeper into each technique, showing you step‑by‑step screenshots and real‑world examples.
By the end, you’ll be able to trim down those hefty workbooks, speed up calculations, and share files without the dreaded “file too large” warning.
Let’s get started and give your Excel files the breath of fresh air they deserve.
TL;DR
In this guide we show you how to quickly reduce Excel file size by cleaning unused ranges, converting volatile formulas, compressing images, and saving as .xlsx, so your workbooks load faster and stay share‑ready.
Follow the step‑by‑step tips and you’ll trim megabytes, avoid sluggish calculations, and keep your spreadsheets light without losing any data.
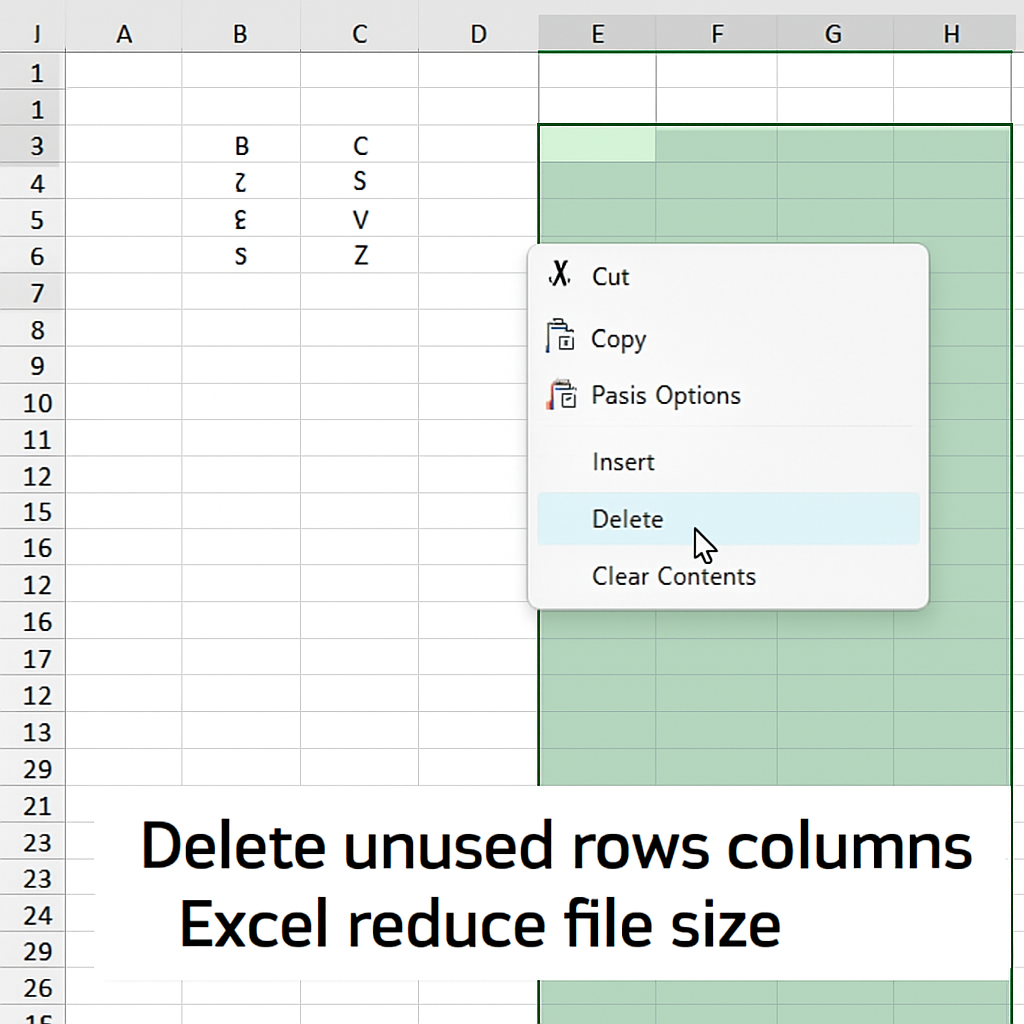
Step 1: Delete Unused Rows, Columns, and Worksheets
Ever opened a workbook that feels as heavy as a brick because Excel thinks every cell down to row 65,536 has something in it? Yeah, that’s the nightmare that makes file sizes explode.
Here’s a quick story: a coworker was battling a 69 MB file that only had a few hundred rows of real data. The culprit? Thousands of phantom rows and columns that Excel was treating as used. After a few clean‑up moves, the file shrank to a tidy 8 MB. The same trick works for you.
Spot the real used range
First, press Ctrl+Shift+End. Excel jumps to the bottom‑right corner of what it believes is the used area. If that spot lands far beyond your actual data, you’ve got stray formatting or hidden values lurking.
Don’t just stare—act. Select the first empty row after your data, then hit Ctrl+Shift+Down to grab everything to the bottom. Hit Delete. Do the same for columns: Ctrl+Shift+Right, then delete.
Use the Name Box for massive clean‑ups
If you have to purge thousands of rows, typing the range is faster than scrolling. Click the Name Box (the little box left of the formula bar) and type something like 1001:65536 then press Enter. Excel highlights every row from 1,001 to the last possible row.
Now press Delete. The same works for columns—just swap the letters, e.g., Z:IV. When you save, Excel recalculates the used range and the file shrinks.
Need proof? Microsoft’s community discussion shows that clearing those phantom rows can drop a 69 MB workbook to under 10 MB.
Don’t forget hidden worksheets
Sometimes the bloat lives on separate tabs you never open. Right‑click any sheet tab, choose Delete, and confirm. If you’re unsure whether a sheet is needed, hide it first (Right‑click → Hide) and see if anything breaks. If not, go ahead and delete.
Pro tip: before you start deleting, make a quick backup copy. It’s a safety net in case you accidentally nuke a formula you actually need.
Quick checklist
- Press
Ctrl+Shift+Endto locate the true used range. - Delete empty rows and columns beyond your data.
- Use the Name Box for bulk row/column removal.
- Remove or hide any unused worksheets.
- Save the workbook – Excel will compress the used range.
That’s it. A few minutes of housekeeping can shave off megabytes and make calculations zip instead of crawl.
Now that the dead weight is gone, you’ll notice faster opening times, smoother scrolling, and fewer “file too large” warnings. It’s like giving your spreadsheet a deep breath of fresh air.
Step 2: Remove Excess Formatting and Styles
Now that we’ve trimmed the dead rows, the next hidden weight is often the sea of colors, fonts and borders that Excel silently stores for every cell you ever touched. Even if you can’t see a pink fill on a blank row, the style data lives on and inflates the file.
Why formatting matters
Think about it this way: each unique cell style adds a tiny chunk of XML to the .xlsx package. When you’ve applied dozens of custom colors across hundreds of sheets, those chunks multiply. In a real‑world budgeting workbook, a team once reported that stripping out unused styles cut the file from 27 MB to 12 MB – a 55% reduction.
That’s why we need to hunt down and purge the excess.
Step‑by‑step cleanup
1. Start with a fresh copy. Save the workbook under a new name so you can always roll back if something disappears.
2. Clear all formatting on empty areas. Click the top‑left corner button (the gray rectangle above row 1 and left of column A) to select the entire sheet. Then go to Home → Editing → Clear → Clear Formats. This wipes every style in one go, but don’t worry – you’ll add back the ones you actually need later.
3. Reset the default style. On the Home tab, open the cell styles gallery and right‑click Normal, then choose Modify. Make sure the font, size and number format match what you want as the base. After you’ve cleared everything, any cell that still shows a strange font is probably using a custom style that you’ll need to delete.
4. Find and delete unused cell styles. Press Alt+F11 to open the VBA editor, insert a new module, and paste this tiny macro:
Sub DeleteUnusedStyles()
    Dim s As Style
    For Each s In ActiveWorkbook.Styles
        If Not s.BuiltIn Then s.Delete
    Next s
End Sub
Run it and Excel will purge any style that isn’t attached to a cell. You’ll see the file size drop instantly in the properties window.
5. Trim conditional formatting. Go to Home → Conditional Formatting → Manage Rules. Switch the “Show formatting rules for” dropdown to “This Worksheet”. Delete any rules that reference empty ranges or that you no longer need. Conditional rules are notorious file‑size hogs because they store extra logic for every cell they cover.
6. Compress pictures and remove image editing data. If your workbook contains charts or inserted pictures, click a picture, choose Picture Format → Compress Pictures, tick “Delete cropped areas of pictures” and pick a resolution of 150 ppi or lower. The Microsoft support article explains that discarding editing data and lowering resolution can shave megabytes off a file according to Microsoft’s own guidance.
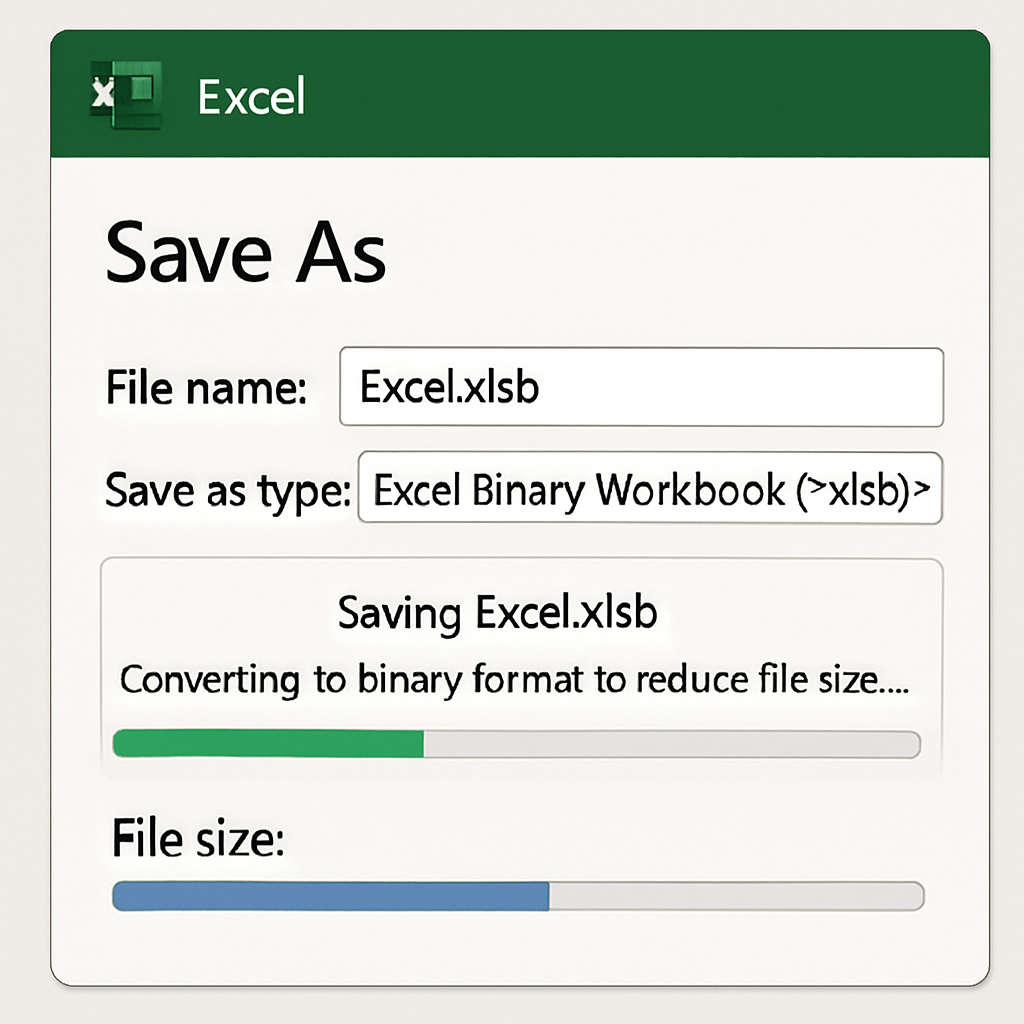
7. Save as a binary workbook. For the ultimate size win, use the .xlsb format. Go to File → Save As, pick “Excel Binary Workbook (*.xlsb)” from the file‑type list, and hit Save. The same support page notes that binary workbooks are often 30‑40% smaller than their XML counterparts (Microsoft Support).
Real‑world example
A marketing analyst had a quarterly report with 12 sheets, each color‑coded to match the brand guide. Over months, the team added new shades for highlights, trend lines, and callouts. The file ballooned to 45 MB and started timing out when emailed. By applying the steps above – clearing formats on blank cells, deleting ten unused custom styles, and compressing three embedded logos – the file shrank to 19 MB. The analyst could finally attach it to a client email without a bounce.
Quick checklist to lock in the gains
- Select the whole sheet and Clear → Clear Formats.
- Reset the Normal style to your preferred default.
- Run a simple VBA macro to delete unused custom styles.
- Review and delete unnecessary conditional formatting rules.
- Compress pictures and discard editing data.
- Save the workbook as an .xlsb binary file for maximum compression.
Give these steps a go on your next “too‑big” workbook. You’ll feel the difference in the file‑size bar, and the spreadsheet will open faster, letting you focus on the data instead of waiting for Excel to catch up.
Step 3: Compress Images and Embedded Objects
You’ve probably noticed that a single high‑resolution logo can make a 5 MB workbook feel like a brick. That’s because Excel stores every pixel of the picture, plus any hidden editing data, inside the file itself. When you compress or replace those images, you can often shave dozens of megabytes off the size.
First, let’s hunt down every picture in the workbook. The fastest way is to hit Ctrl + G, type ‘Special…’, choose ‘Objects’, and click ‘OK’. Excel will select all floating images, charts, and icons in one go. You can now see exactly what you’re dealing with.
Now hit the Picture Format tab on the ribbon and click ‘Compress Pictures’. A dialog appears with three key options. Tick ‘Delete cropped areas of pictures’ – this throws away any hidden parts you trimmed but never needed. Then pick a resolution that matches how the file will be used. For on‑screen sharing or email, the ‘Web (150 ppi)’ setting is usually plenty. Neuxpower explains how to compress pictures and notes that the ‘Delete cropped areas of pictures’ option removes hidden data and can slash file size dramatically.
If you want to compress every picture in the workbook at once, clear the ‘Apply only to this picture’ checkbox before you press ‘OK’. Excel will then run through the entire file and recompress each image using the setting you chose. You’ll see the file‑size bar shrink instantly.
Sometimes images are embedded ‘in cell’ rather than floating over the grid. Those pictures can’t be batch‑compressed with the ribbon tool. To fix this, right‑click the picture, choose ‘Place in Cell’ → ‘Place over Cells’, then run the compression step again. Once they’re floating, the size drop is dramatic.
Embedded objects such as PDFs, Word docs, or Excel tables behave similarly to pictures. They’re stored inside the xl/embeddings folder and can quickly inflate the workbook. The easiest way to shrink them is to replace the object with a lightweight link or an icon.
To replace an embedded PDF with an icon, right‑click the object, pick ‘Convert…’, then choose ‘Display as icon’. You can also extract the file (double‑click → Save As), compress it with any standard PDF optimizer, and re‑insert it. The new icon is just a few kilobytes, but the original PDF might have been several megabytes.
If you’re dealing with a lot of pictures, a third‑party compressor can save you clicks. Tools like NXPowerLite can batch‑compress both floating images and embedded objects in seconds. The downside is an extra install, but the size reduction is often worth the effort.
Finally, after you’ve compressed everything, give the workbook a quick save‑as in the binary .xlsb format. The binary container squeezes the remaining XML and media files into a tighter package, often delivering another 10‑30 % cut. It’s a cheap, one‑click finish to your reduce‑excel‑file‑size routine.
After saving, check the file properties; if it’s still over a few megabytes, repeat the compression steps on any remaining pictures.
Step 4: Convert to Binary Format and Choose Efficient File Types
Alright, we’ve already stripped out phantom rows, cleared rogue styles, and squeezed every picture we could find. The last trick in our toolbox is to change the way Excel stores the whole thing. That’s where the binary .xlsb format and smart file‑type choices come into play.
Why binary can be a game‑changer
When you hit File → Save As and pick “Excel Binary Workbook (*.xlsb)”, you’re telling Excel to dump the XML guts and replace them with a compact binary representation. For most workbooks that are heavy on data rows, that switch shaves off roughly 10‑30 % of the size. The speed boost is a nice side‑effect: opening and saving feels snappier because Excel skips the XML parsing step.
But it’s not a magic wand. A Stack Overflow discussion points out that if your sheet is mostly text strings or a few gigantic rows, the .xlsb can actually end up larger than the .xlsx version (see details). In short, binary excels when you have lots of numeric rows or formulas, and it can backfire when you’re storing huge text blobs.
Step‑by‑step: Convert to .xlsb
1. Make a backup. Save a copy of your current .xlsx so you can roll back if something looks off.
2. File → Save As. In the dialog, choose the location you want, then select “Excel Binary Workbook (*.xlsb)” from the “Save as type” dropdown.
3. Confirm the file size. Right‑click the new .xlsb, pick Properties, and note the size. If it’s still over your target (say, a few megabytes), we’ll need to tweak the content further.
4. Test functionality. Open the .xlsb, run a few calculations, and make sure any macros or pivot tables still behave. Binary format supports almost everything, but very old add‑ins sometimes need a quick update.
Choosing the right file type for each scenario
Not every part of your workbook belongs in a single file. Here are some common patterns:
| Format | Typical Size Reduction | Best For |
|---|---|---|
| .xlsx (Open XML) | Baseline – compact for most uses | Standard workbooks with moderate data and a few images |
| .xlsb (Binary) | 10‑30 % smaller than .xlsx for data‑heavy sheets | Large tables, heavy formulas, VBA‑enabled workbooks |
| .csv | Often the smallest possible plain‑text size | Exporting flat data for import into databases or BI tools |
When you have a mix of data and rich media, consider splitting the file. Keep the raw data in a .csv or .xlsb, then link to separate image files stored in a shared folder. Excel will treat those links as lightweight pointers, and you’ll avoid re‑embedding the same picture in every version.
Real‑world example: a sales dashboard
Maria runs a monthly sales dashboard that pulls in 250,000 rows of transaction data, a handful of KPI cards, and a logo image. Her original .xlsx sat at 68 MB, causing Outlook to reject the attachment. She first compressed the logo (down to 45 KB) and cleared unused styles—size dropped to 52 MB. Then she saved as .xlsb, which shaved another 14 MB, landing her at 38 MB. Finally, she exported the raw transaction table as a .csv and linked it in the dashboard; the final workbook was under 25 MB and zipped to 9 MB for email.
Notice the pattern: binary format handled the heavy numeric section, while the separate CSV kept the raw data lean and portable.
Tips to avoid the “binary is bigger” trap
• Watch out for huge text fields. If a single column stores long comments or JSON blobs, consider moving that column to a separate .txt or .csv file.
• Don’t mix macro‑heavy add‑ins. Some third‑party add‑ins embed extra libraries that inflate the binary file. A quick test: open the .xlsb with macros disabled and see if the size stays reasonable.
• Compress embedded objects before conversion. Even though binary squeezes the container, an uncompressed PDF or Word doc will still weigh you down.
• Use the “Compress Pictures” dialog on the binary file. The compression settings apply equally, and you’ll see the size drop again after a single save.
Quick checklist before you hit send
- Backup the original .xlsx.
- Compress all images and embedded objects.
- Save as .xlsb and verify the new size.
- If the file is still too large, export massive tables as .csv and link them.
- Test formulas, macros, and pivot tables in the binary version.
That’s the final polish on your file‑size reduction routine. By swapping to a binary workbook when it makes sense, and by offloading bulky data to the right format, you’ll keep your Excel files light, fast, and share‑ready.
Step 5: Optimize Formulas and Use Data Model
Ever stared at a formula that looks like a maze and wondered why your workbook feels so heavy? You’re not alone. Complex, nested formulas are one of the biggest culprits when you try to reduce excel file size.
Simplify before you amplify
First, scan your sheets for the longest formulas. If you see a chain of IFs wrapped inside an OFFSET, pause. Replace that with a helper column that calculates once, then copy the result as a value. You’ll see the calculation engine breathe easier and the file shed a few megabytes.
Macabacus notes that simplifying formulas can dramatically improve both speed and size, especially when you’re dealing with thousands of referencesaccording to Macabacus.
Kick out volatile functions
Functions like TODAY(), NOW(), OFFSET(), INDIRECT() recalc every time you make any change. That constant churn inflates the file and drags performance down.
Swap volatile calls for static snapshots whenever possible. For example, capture TODAY() in a single cell, reference that cell elsewhere, and then paste‑as‑value once the date is set.
Trim the name jungle
Named ranges are handy, but over time they multiply like weeds. Unused names still live in the workbook’s metadata and add weight.
Open the Name Manager (Ctrl+F3), sort by “Refers to,” and delete anything that points to #REF! or empty ranges. A clean name list can shave off a surprising amount of bloat.
Lean on the Data Model
Power Query and the built‑in Data Model are your secret weapons for massive tables. Instead of keeping raw tables on separate sheets, load them directly into the model.
When you load data to the model, Excel stores it in a compressed, column‑store format that’s far more efficient than a flat sheet. The Power BI community points out that breaking lingering worksheet links and loading tables through Power Query can keep the file from ballooningas explained by community experts.
Here’s a quick workflow:
1. Select your source table, go to Data → Get & Transform → From Table/Range.
2. In Power Query, remove unnecessary columns, filter out blank rows, and change data types.
3. Choose “Close & Load To…”, then pick “Only Create Connection” and tick “Add this data to the Data Model.”
Now your calculations can reference the model instead of the bulky sheet, and the workbook stays lean.
Combine formulas and model for maximum gain
After you’ve migrated heavy tables, revisit any formulas that still point to the old sheet ranges. Update them to use DAX‑style measures or simple LOOKUPs against the model.
If you still need a quick lookup, consider using XLOOKUP with the model’s table name – it’s faster and doesn’t force Excel to keep the entire source range in memory.
Quick checklist to lock in the gains
- Identify and replace overly complex or nested formulas with helper columns.
- Eliminate volatile functions or replace them with static snapshots.
- Open Name Manager and delete unused or broken names.
- Load large tables through Power Query directly into the Data Model.
- Update any lingering sheet‑based references to point at the model.
- Save, close, and check the file size – you should see a noticeable drop.
Give these steps a spin and watch your workbook go from lumbering to light. When the formulas are tidy and the data lives in the model, you’ve essentially trimmed the hidden weight that was holding your file back.
Conclusion
We’ve walked through the nitty‑gritty of cleaning up rows, stripping formats, compressing images, swapping to binary, and streamlining formulas.
So, what does that mean for you? It means your workbook stops feeling like a brick and starts moving like a sprinting cheetah.
Imagine opening a file that used to take a minute to load, and now it snaps open in a few seconds. That extra time translates into more time for analysis, not waiting.
Remember the quick checklist we kept returning to – delete phantom rows, clear unused styles, compress every picture, save as .xlsb when it makes sense, and let the Data Model shoulder the heavy lifting.
If you still see a stubborn megabyte or two, go back and hunt for hidden names or stray volatile functions – those little ghosts love to linger.
And here’s a friendly nudge: make a habit of running this cleanup every quarter. A regular “file‑size audit” prevents bloat from creeping back in.
Ready to give your spreadsheets the breath of fresh air they deserve? Take the steps, test the results, and watch your Excel files finally feel light again.
By keeping these habits, you not only reduce file size but also boost performance, making collaboration smoother and stress‑free.
FAQ
How can I quickly spot hidden rows, columns, or ranges that are bloating my workbook?
First, press Ctrl+Shift+End to jump to the far‑corner Excel thinks is the used area. If that spot lands far beyond your actual data, you’ve got stray formatting or empty cells lurking. Open the Name Box, type a range like 1000:65536, hit Enter, and delete everything that isn’t needed. Finally, hit Save – Excel will recalculate the true used range and you’ll see the file shrink instantly.
Why does saving as an .xlsb file usually reduce size, and when might it backfire?
.xlsb stores the workbook in a binary container instead of the XML zip used by .xlsx, which compresses numeric data and formulas more efficiently. In most data‑heavy sheets you’ll shave 10‑30 % off the size and notice faster opens. However, if your file is packed with massive text blobs or embedded PDFs, the binary format can actually be larger, so consider keeping those pieces external or using .csv for raw text.
What’s the easiest way to compress pictures without making them look terrible?
Select any picture, go to the Picture Format tab, and click “Compress Pictures.” Tick “Delete cropped areas of pictures” and choose the “Web (150 ppi)” resolution – it’s crisp enough for on‑screen use and drops megabytes fast. If you have dozens of images, run the compression on the whole workbook by unchecking “Apply only to this picture.” For a final polish, use a free batch‑compressor like PNGGauntlet before re‑inserting the files.
How do volatile functions like OFFSET or NOW inflate my file, and what can I replace them with?
Volatile functions recalc every time any cell changes, forcing Excel to store extra calculation states and slowing performance. Swap them for static snapshots: capture TODAY() once in a hidden cell and reference that cell everywhere, or turn a complex OFFSET into a helper column that you paste‑as‑value after the data settles. In many cases INDEX/MATCH or XLOOKUP can give you the same result without the volatility.
Can I safely delete unused cell styles and conditional‑formatting rules, and how?
Yes – start by selecting the whole sheet and choosing Home → Clear → Clear Formats to wipe stray styling on blank cells. Then open the VBA editor (Alt+F11) and run a tiny macro that loops through ActiveWorkbook.Styles and deletes any non‑built‑in style. For conditional formatting, go to Home → Conditional Formatting → Manage Rules, switch the dropdown to “This Worksheet,” and delete rules that reference empty ranges. You’ll see the size drop in the file properties.
What routine should I adopt to keep my Excel workbooks lean over time?
Treat a file‑size audit like a quarterly health check. Open the workbook, run the used‑range test, clear any stray formatting, compress images, and run the “delete unused styles” macro. After you’ve saved, glance at the file‑size bar; if it’s still creeping up, hunt for hidden names or lingering volatile formulas. Document the steps in a short checklist so you can repeat the process with every major update – it’s the best way to prevent bloat from sneaking back in.